QuickBooks Online makes invoicing easy, letting you create sleek, professional invoices in minutes. With customizable templates, built-in online payment options, and real-time tracking, it takes the guesswork out of getting paid.
However, accurate invoicing isn’t just about sending a bill; it’s about keeping your cash flow steady, staying compliant with tax rules, and showing your clients you mean business.
In this guide, we’ll break down everything you need to know about how to create and send invoices in QuickBooks Online, step by step.
We’ll also share pro tips, common pitfalls to avoid, and how doola helps ensure your business stays compliant while you focus on growth.
Before You Start: Setting Up QuickBooks Online for Invoicing
Before you hit “Send,” let’s make sure your QuickBooks Online account is properly configured.
- Verify your company details: Add your business name, upload your logo, and set default payment terms (like Net 30, meaning your client has 30 days to pay). This ensures every invoice looks professional and consistent.
- Link your bank account and payment processors: QuickBooks Payments lets clients pay you directly by credit card, ACH, or PayPal. Faster payments = healthier cash flow.
- Configure sales tax settings: Enter your tax rates based on your state or country. This ensures you’re charging the right amount (and not leaving money on the table).
- Set up a product/services catalog: Preload your offerings with descriptions, prices, and even photos. This saves time when adding line items later.
How to Create an Invoice in QuickBooks Online: Step-by-Step
Before you can get paid, you’ve got to get your invoice right. QuickBooks Online makes this process surprisingly simple and ensures your invoices are accurate, polished, and professional.
Here’s how to go from logging in to having a ready-to-send invoice in just a few steps:
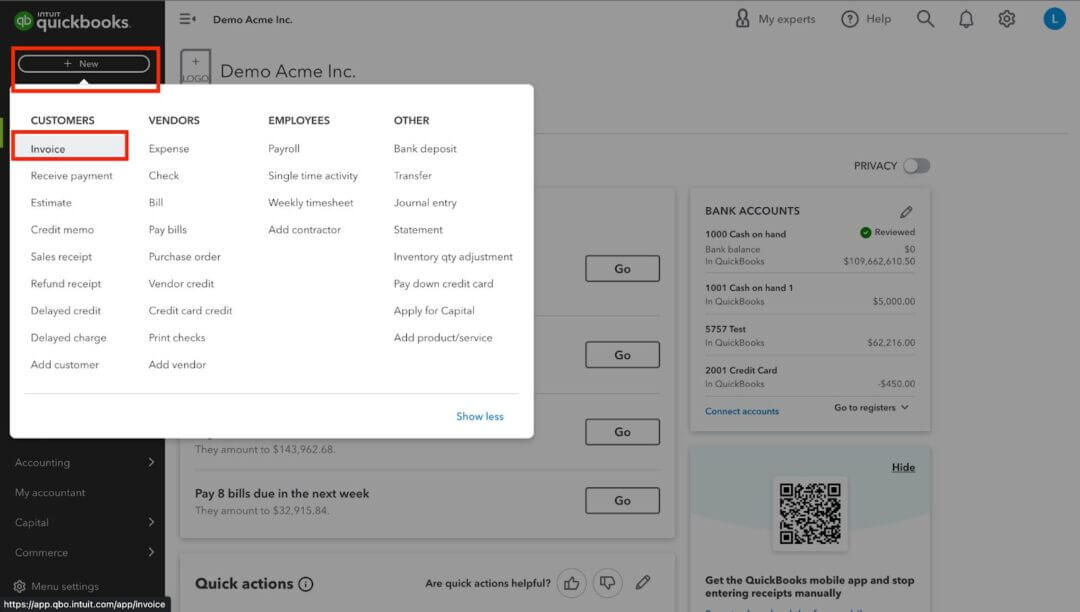
Step 1: Log in and Navigate to “+ New” → “Invoice”
Once inside QuickBooks Online (QBO), your starting point is the left-hand navigation panel.
Select the “+ New” button and then click “Invoice.” This opens up the invoice creation screen where you’ll key in all the details.
Step 2: Select or Add a Customer
If you’ve invoiced this client before, simply select their name from your existing list. QuickBooks will automatically populate their saved details (like billing address and preferred terms).
For new clients, click “+ Add new customer” and input their full details, including:
- Business name or individual’s name
- Billing address
- Email address (essential for digital invoices)
- Payment preferences
Step 3: Fill in Invoice Details
- Dates & Payment Terms: Enter the invoice date and set the due date. Terms like “Net 15” or “Net 30” tell your client when payment is due. For example, an invoice dated March 1 with Net 30 terms means payment is due March 31.
- Line Items: Add the products or services you’re billing for. Include descriptions, quantity, unit price, and any applicable discounts, shipping fees, or sales tax.
Example: A consultant billing 10 hours at $100/hour adds “Consulting services” as a line item, with a total of $1,000. If sales tax is 6%, QuickBooks automatically calculates $60, making the total $1,060.
- Extras: Use QuickBooks’ attachment feature to include relevant documents, like signed contracts, scope of work, or photos. You can also add notes or custom terms (e.g., “Late payments may incur a 2% fee”).

Step 4: Preview Your Invoice
Before you send anything out, hit the Preview button. This shows you exactly how your client will see the invoice.
Check for:
- Typos or missing details
- Correct totals, tax calculations, and discounts
- Professional appearance of branding (logo, colors, etc.)
And that’s it, you’ve just created a professional, client-ready invoice in QuickBooks Online.
How to Send an Invoice in QuickBooks Online

QuickBooks Online (QBO) streamlines this process by letting you send invoices directly from the platform and even embedding payment links for faster collection.
Here’s how to do it step by step:
Step 1: Click “Save and Send”
Once you’ve reviewed and finalized your invoice, select “Save and Send.” This ensures the invoice is stored in your QuickBooks records and at any given point, you can track your sent invoices.
Step 2: Customize the Email Subject and Message
Your invoice email is often the first thing your client sees, so make it clear and professional.
QuickBooks auto-generates a subject line and body, but you can (and should) customize it.
- Subject Line: Keep it simple and direct, e.g., “Invoice #1234 from [Your Business Name] – Due [Date].”
- Body Message: Add a polite note that matches your brand tone. Example: “Hi [Client Name], please find your invoice attached. Payment is due by [Due Date]. Thank you for your business!”
- Recipients: Enter the main client email. Use Cc for internal stakeholders (like project managers) and Bcc if you’re keeping a copy for your records.
Step 3: Enable Online Payments
You can embed payment options directly into your invoice.
- Credit Card Payments: Clients can pay instantly, though a small processing fee applies.
- ACH Bank Transfers: Lower fees, great for larger invoices.
- PayPal Integration: Useful for international or smaller clients who prefer digital wallets.
When enabled, your client will see clickable payment links inside the invoice email.
⚡ doola Tip: Set Up Recurring Invoices & Automated Payment Reminders

If you work with repeat clients or subscription-style projects, you don’t need to manually send invoices each month.
QuickBooks lets you automate the process:
Recurring Invoices Setup
- From the invoice screen, select “Make recurring.”
- Enter the interval (weekly, monthly, quarterly, etc.).
- Choose a start date, end date, or set it to “unspecified” if it’s ongoing.
- Customize terms and notes (e.g., “Monthly retainer for August 2025”).
📌 Example: Let’s say a social media agency bills a client $1,200 monthly for management services. Instead of creating a new invoice each month, QuickBooks automatically generates and emails it, hands-free.
Automated Payment Reminders

- Go to Settings → Account and Settings → Sales.
- Under “Reminders,” select Edit and enable Automatic Invoice Reminders.
- Choose the intervals: From the dropdown menus, choose days, and before/after to indicate when to send the reminder. 7 days before due – On the due date – Customize your reminder message (keep it polite but firm).
This not only saves you from follow-ups but also creates consistency. Clients know your system will remind them automatically, which encourages timely payments.
Tracking and Managing Your Invoices

QuickBooks Online (QBO) gives you a full command center for monitoring invoice lifecycles, nudging clients, and keeping your books perfectly aligned.
Here’s how to run a tight, professional A/R (accounts receivable) workflow, step by step.
1. Invoice Status Tracking

Let’s understand what the statuses mean:
- Draft/Unsent: You created the invoice but haven’t sent it yet.
- Sent: The invoice email went out from QBO (or you marked it as sent).
- Viewed: Your client opened the invoice link, ideal moment to follow up if needed.
- Partially paid: A payment was applied, but a balance remains.
- Paid: The invoice is fully settled.
- Overdue: The due date passed and the balance remains unpaid.
- Voided: The invoice remains in records with a $0 balance for audit trail.
🔍 How to track & filter your invoices

- Go to Sales → Invoices.
- Use the Status filter (e.g., Overdue, Viewed, Paid) to narrow your list.
- Sort by Due date to see what needs attention first.
- Click any invoice to view the Activity timeline (created, sent, viewed, reminders sent, payments applied).
Note: A pop-up window will appear on screen and you’ll find the status under Invoice Activity.

2. Automated Reminders
Let’s cover two scenarios here.
✔️ Company-wide reminder setup
- Go to Settings → Account and Settings → Sales.
- Find Reminders and toggle Automatic invoice reminders on.
- Add schedules (e.g., 3 days before due, on the due date, 7 days overdue).
- Customize the message for each stage (friendly pre-due vs. firm but polite overdue).
- Save.
✔️ Invoice-level controls
- Open a specific invoice.
- Click More → Send reminder to trigger a one-off nudge.
- Edit the reminder message if the situation needs a custom tone (e.g., VIP clients).
3. Record Manual Payments
QBO lets you log and match payments even for clients who pay by wire, check, or cash.
✔️ Recording a payment
- Open the invoice and click Receive payment.
- Choose the Payment method (check, cash, wire).
- Select the Deposit to account: Undeposited Funds if you’ll group multiple checks/wires before depositing. Bank account if this payment is deposited alone.
- Enter Reference no. (e.g., check number or wire ID) and Payment date.
- Save. The invoice status updates to Partially paid or Paid.
Example: Say a customer made a credit card payment online on the credit card website itself. Now, he wants to record the “checking account deduction” for this transaction on QuickBooks.
The first two steps are simple: + New → Check

Next, in the Bank Account field, he needs to select the Checking account from the dropdown and fill out the necessary information.

✔️ Handling partials, overpayments & fees
- Partial payments: If a client pays $400 on a $1,000 invoice, record $400. The invoice shows $600 due.
- Overpayments: If they accidentally pay $1,050 on a $1,000 invoice, record $1,050 and create a credit on their account ($50) for the next invoice or issue a refund receipt.
- Bank fees: If your bank deducts a $15 incoming wire fee, record the full customer payment against the invoice, then record the $15 bank charge separately to an expense account (e.g., “Bank Fees”) so your A/R stays accurate.
✔️ Depositing grouped payments

- Go to + New → Bank deposit.
- Select the payments sitting in Undeposited Funds that were actually deposited together.
- Save. This matches the single deposit you’ll see in your bank feed.
4. Edit, Void or Duplicate
Here’s how to make your corrections the right way:
✔️ When to edit
- Typos, wrong memo, missing PO number, or minor changes before the client pays.
- Open the invoice → make changes → Save and send again.
✔️ When to use a credit memo instead of editing
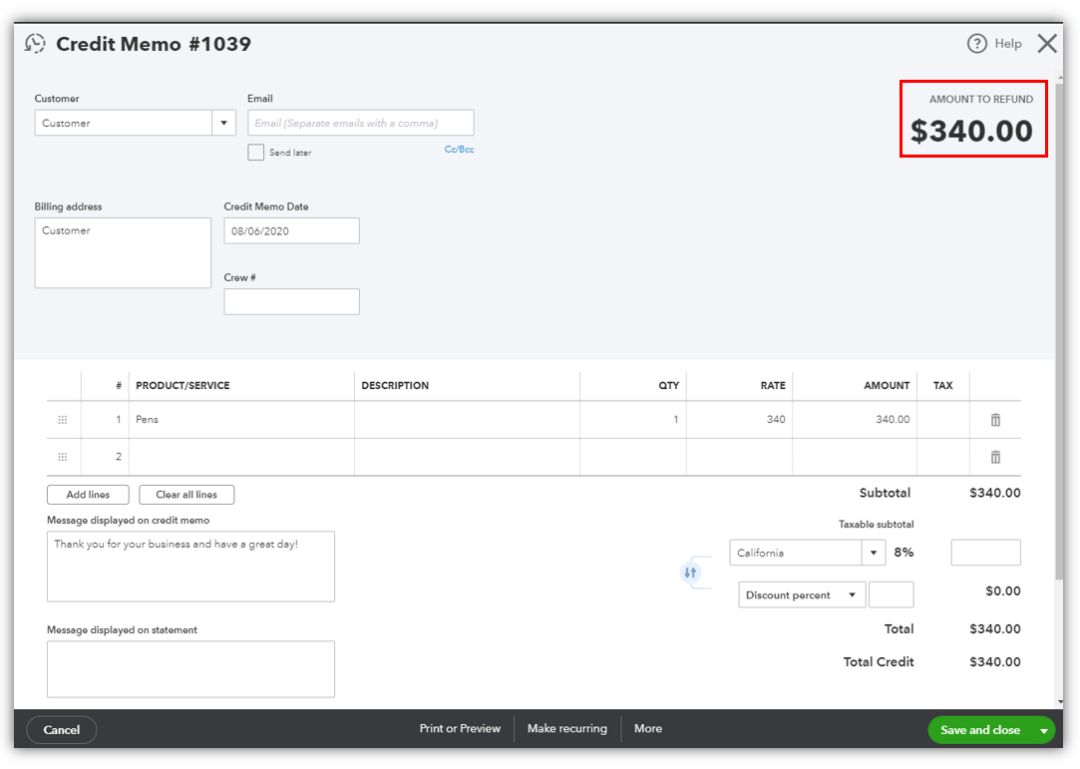
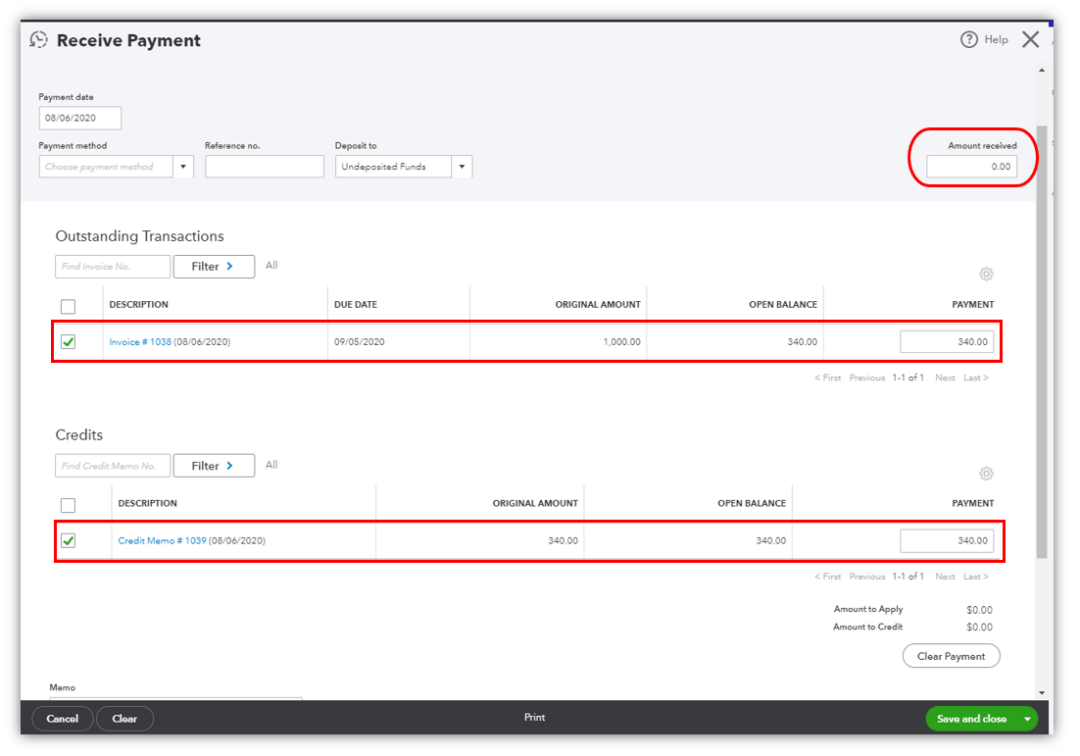
If an invoice is partially or fully paid, don’t rewrite history. Issue a Credit Memo to adjust or refund.
Follow these steps to apply the credit and close the invoice:
- Head back to the + New button and select Receive Payment.
- In the Customer field, choose the same client who received the refund.
- QuickBooks will display the customer’s outstanding balance alongside the available credit memo.
- Check the box for the correct invoice number and the corresponding credit memo. The Amount received field should now automatically adjust to 0.00.
- Once everything looks correct, click Save and Close to finalize the process.
✔️ When to void
The invoice was created in error and should not impact revenue, but you need an audit trail.
Open invoice → More → Void (QBO keeps a $0 record).
✔️ When to duplicate
Same structure, recurring deliverables, or new period billing.
Open invoice → More → Copy → adjust dates/amounts → send.
doola Tip: Avoid deleting invoices; it removes the audit trail and can complicate reconciliations and compliance.
5. Aging Reports & A/R Analytics

Knowing who owes you, and for how long, helps you prioritize outreach and forecast cash.
✔️ Run the right reports
- Go to Reports.
- Open Accounts receivable aging summary (high-level view) or A/R aging detail (invoice-level details).
- Choose a Report period and Aging method (typically by due date).
- Customize columns or filter by Customer if you’re focusing on a subset.
- Save customization for one-click reuse each week.
✔️ How to read it
- Buckets like Current, 1–30, 31–60, 61–90, >90 days show how late balances are.
- Prioritize oldest/highest balances for outreach.
- Track trends month over month to see if collections are improving.
✔️ Quick DSO (Days Sales Outstanding) check
- DSO ≈ (A/R Balance ÷ Average Daily Sales).
- Example: A/R of $45,000 and average daily sales of $1,500 → DSO = 30 days.
| ⚡ doola Tip: Always aim to lower DSO via online payments, reminders, and clear terms. |
✔️ Turn insights into action
- 1–30 days: Automated reminder, friendly follow-up.
- 31–60 days: Personal email + phone call; offer payment plan if needed.
- 61–90+ days: Senior follow-up, final notice, evaluate late fees (if disclosed in terms), or collections policy.
Here’s a quick example to help you understand the process better.

📌 Important: If you have multiple open invoices, send a Customer Statement summarizing all outstanding items to reduce back-and-forth.
Put it All Together: A Simple Weekly A/R Cadence
| Day | Action |
| 📆 Monday | Run A/R Aging Summary Flag the top 10 outstanding balances |
| 📆 Tuesday | Send personalized reminders for 31–60 day overdue items Attach customer statements. |
| 📆 Wednesday | Log manual payments (check, cash, wire), make depositsMatch with bank feed. |
| 📆 Thursday | Review “Viewed but unpaid” invoices Do a quick follow-up check-in |
| 📆 Friday | Update your notes, apply credits/late fees per policySave customized reports for records. |
Common Invoicing Mistakes to Avoid in QuickBooks Online
Even seasoned business owners make invoicing slip-ups that can hurt cash flow and client relationships.
Here are the most common mistakes, what they cost your business, and how to fix them before they snowball into bigger problems:
| ❌ Mistake | 📉 Business Impact | ✅ Solution |
| Forgetting to set payment terms | Clients won’t know when payment is due, leading to unpredictable cash flow and awkward follow-ups. | Always include clear terms (Net 15, Net 30, or custom) so clients understand expectations upfront. |
| Missing or applying incorrect tax rates | Undercharging = you cover the tax out of pocket. Overcharging = compliance risk and unhappy clients. | Double-check your tax settings in QuickBooks. If you serve multiple regions, confirm you’ve added the correct sales tax rates for each. |
| Duplicate or inconsistent invoice numbers | Creates confusion when tracking payments, can complicate audits, and damages professionalism. | Let QuickBooks auto-generate sequential invoice numbers, or create a clear numbering system (e.g., INV-2025-001). |
| Not following up on overdue invoices | Outstanding payments linger, hurting your cash flow and straining client relationships. | Enable QuickBooks’ automated reminders to send professional nudges. |
| Forgetting notes, discounts, or attachments. | Missing documents like contracts or agreed discounts can delay approval, frustrate clients, and slow payments. | Use QuickBooks’ attachment feature to add supporting files. Review discounts carefully to avoid billing disputes. |
The Pre-Send Invoice Checklist
Before you hit “Send,” run through this quick checklist to ensure every invoice is accurate, professional, and payment-ready:
✅ Invoice Number: Confirm it’s unique and sequential. This keeps your books clean and audit-ready.
✅ Payment Terms: Ensure due dates are clear (Net 15, Net 30, etc.) to set client expectations and protect your cash flow.
✅ Taxes: Verify the correct sales tax is applied. If you’re billing across states or countries, confirm you’ve selected the right rates.
✅ Line Items: Double-check product/service descriptions, quantities, and rates for accuracy. Even small typos can cause disputes.
✅ Attachments & Notes: Include contracts, project outlines, or personalized notes to reduce back-and-forth and improve client trust.
Save this checklist as a QuickBooks workflow reminder or internal SOP so your team never misses a detail.
Advanced Tips to Save Time and Look More Professional
QuickBooks Online (QBO) has brilliant features that save hours, impress clients, and make your billing process run smoothly.
Here’s how to step up your game:
1. Create Custom Invoice Templates That Reflect Your Brand
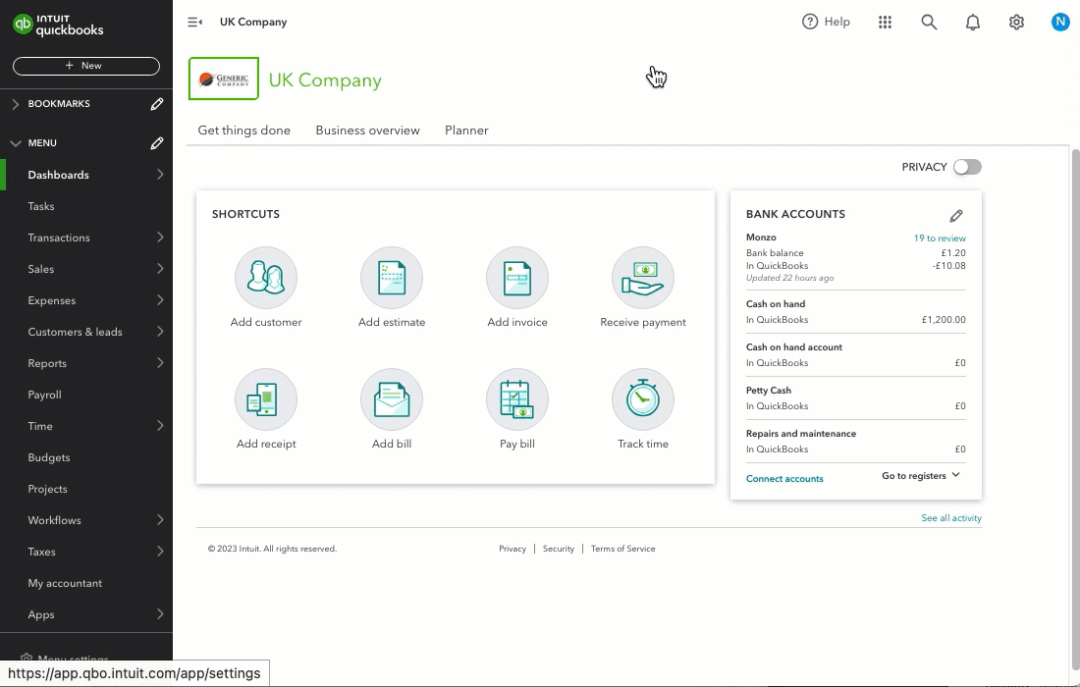
Using QuickBooks’ custom template builder, you can upload your logo, adjust colors, and tweak layouts so every invoice looks like it came straight from your brand playbook.
Example: A freelance designer can use a modern, minimalist template that mirrors her portfolio website. The invoice instantly looks 10 times more polished and consistent, reinforcing her brand professionalism.
| ⚡ doola Tip: If you work with different client segments (e.g., corporate vs. small startups), create multiple templates tailored to each audience for extra personalization. |
2. Offer Multiple Payment Options for Faster Collections
The easier you make it for clients to pay, the faster money lands in your account. QuickBooks lets you enable ACH transfers, credit card payments, and PayPal directly within invoices.
Here’s an example:
- Client pays a $1,000 invoice.
- ACH fee: 1% capped at $10 → you pay $10 max.
- Credit card fee: ~2.9% → you pay $29.
Even with fees, you’re saving time by avoiding collection delays. For scaling businesses, the speed of cash flow is worth more than the small processing cost.
3. Automate Friendly Payment Reminders
Manually chasing payments is awkward, time-consuming, and let’s face it: nobody enjoys it.
QuickBooks’ automated reminder feature sends polite nudges at intervals you choose (e.g., 7 days before due, on the due date, and 5 days after if unpaid).
4. Integrate with CRMs & Time-Tracking Tools
If you bill for time or projects, integrations can be a game-changer. QuickBooks syncs with tools like HubSpot, Salesforce, or Toggl, pulling logged hours or project milestones directly into invoices.
This ensures “zero” data entry errors and hours saved every billing cycle.
Example: Say an agency charges $75/hour for design services. Instead of manually entering 42 hours into QuickBooks, the integration auto-imports the data, generating an invoice for $3,150 with correct hours, rates, and project codes.
5. Use Multi-Currency Invoices for International Clients

If you’re working with global clients, QuickBooks supports multi-currency invoicing, automatically converting amounts into the client’s local currency while tracking your books in USD (or your home currency).
You just need to enable Multicurrency following a few simple steps:
- Click the Settings icon, then choose Account and Settings.
- From the left menu, select Advanced.
- In the Currency section, click Edit.
- Open the Home Currency dropdown and pick your preferred currency.
- Check the box for Multicurrency and confirm that you understand this option cannot be undone once activated.
- Click Save to apply the changes.
Example: Suppose a US-based consultant invoices a UK client for £2,000. QuickBooks automatically applies the day’s exchange rate (~$2,550 USD) and records the conversion.
How doola Helps You Run a Compliant and Organized Business

Invoicing works best when your business structure and compliance are solid.
If your LLC or Corporation isn’t set up properly, or your EIN and state filings aren’t in order, even perfect invoices won’t protect you from tax headaches.
That’s where doola steps in as your partner for success. We help founders go beyond just sending invoices, we ensure their entire business is structured to thrive and scale:
- Form US businesses with confidence: Whether you’re launching an LLC or Corporation, doola makes the process seamless, so you can focus on growth instead of paperwork.
- Secure EINs for tax and banking: We handle your Employer Identification Number quickly, ensuring you can open bank accounts, hire employees, and stay tax-compliant without the hassle.
- Stay compliant year after year: From annual filings to state-level requirements, doola keeps you on track, so you never miss a deadline or face unexpected penalties.
With doola Formation & Compliance, you’re not just building a business, you’re building a future-proof foundation that supports smooth operations, financial clarity, and long-term growth.
Book a demo today and let doola take care of compliance, so you can take care of scaling your business.
FAQs

Can I send invoices in QuickBooks Online from my phone?
Yes, the QuickBooks mobile app lets you create, send, and track invoices on the go.
How do I accept online payments through QuickBooks invoices?
Enable QuickBooks Payments or integrate PayPal/ACH so clients can pay directly from the invoice.
Can I schedule recurring invoices?
Absolutely, great for subscription services or retainer clients.
What’s the difference between an invoice and a sales receipt?
An invoice requests payment (to be paid later). A sales receipt confirms immediate payment.
Does QuickBooks Online track overdue invoices?
Yes, it flags overdue invoices and can send automatic reminders.
How can I customize invoice templates?
Under Settings → Custom Form Styles, you can add logos, change colors, and edit layouts.
Do I need a US business entity to use QuickBooks Online for invoicing?
No, but if you’re managing US clients, a US entity ensures compliance, easier payments, and smoother taxes (that’s where doola helps!).


